

Carefully selected materials that deliver exceptional print quality, durability, and shelf presence.


 New
New

















What Is a Dieline in Packaging & Print: A Detailed Guide
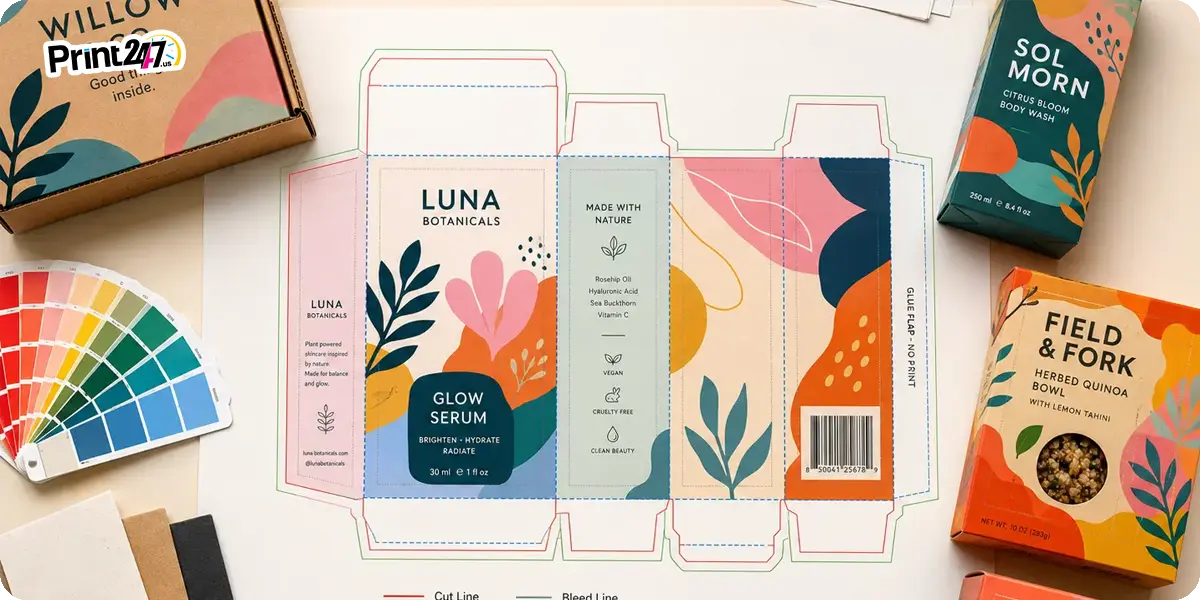
On the outside, most people see packaging as a finished object. It could be a printed box, sleeve, folding carton, or label sitting on a shelf or shipping out to a customer. However, a lot of things go in the making of such packaging to achieve a final look. The finished piece people see usually starts as a flat layout that has to be carefully planned before production begins. This layout is known as dieline and it is one of the significant elements when designing a packaging or a printing material.
For brands working with us, dieline is more than just a technical detail. It is the stage where structure, branding, print production, and product fit all come together under the same umbrella. When this process is precise to the minute details, it results in a packaging that folds perfectly, the artwork looks clean without any displacement, and the edges stay smooth, making the final result look polished and professional. If it goes wrong somehow, you get the exact opposite of what you expect. A packaging that has misaligned graphics, cut off text around the edges, and a failed structure.
In this blog article, we’ll discuss what a dieline is, what things belong inside it, and how to use it properly. Once you understand the core basics, you can move forward in the packaging designing process with far more confidence.
What Is a Dieline?
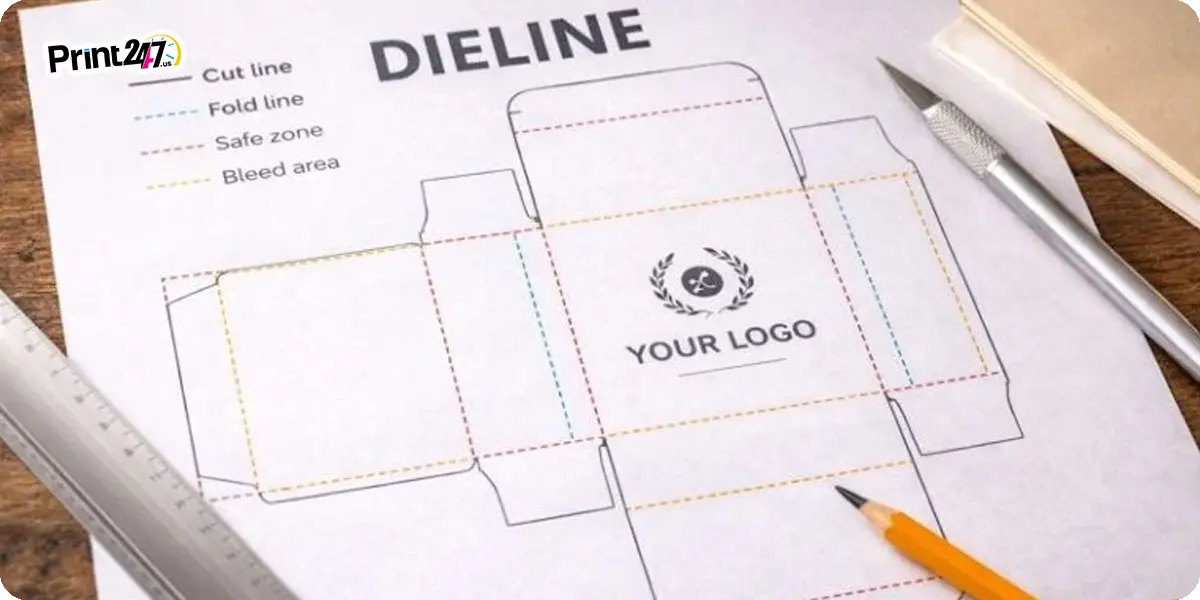
A dieline is a flat or two-dimensional (2-D) template which clearly shows the outline of a packaging before assembly. It performs as a technical guide for involved parties, designers and manufacturers, to see exactly where the package will be cut, folded, and glued.
Think of it as the packaging version of a floor plan. The package could end up being a box in three dimensions, but the dieline shows that structure in a flat form first. That flat file helps everyone involved understand how the final package will come together. It also gives the artwork team a roadmap to follow so the printed design aligns with the structure rather than going against it.
In packaging and print, the term covers more than just the outline. A full fledged dieline contains different aspects like cut path, crease or folding lines, bleed area, safe or printable zone, gluing tabs, and additional features like perforations.
What Elements Are Included In a Dieline
A perfect dieline contains several elements, and each one serves a specific purpose in die cutting and production. These elements clearly communicate to the relevant manufacturing and die cutting parties how to turn a flat sheet into a finished package.
Cut lines
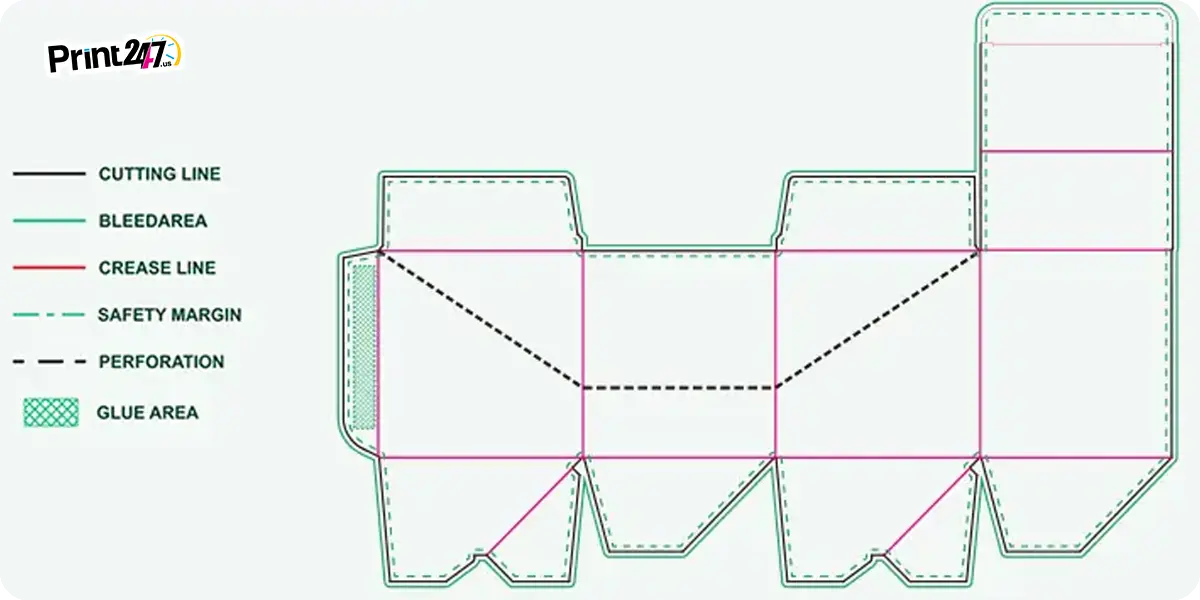
Cut lines show the exact boundary where the material will be cut to create the outer shape of the packaging. These lines define the final outline after the excess material is removed. They are essential because they tell the production team exactly where the package ends.
Fold or crease lines
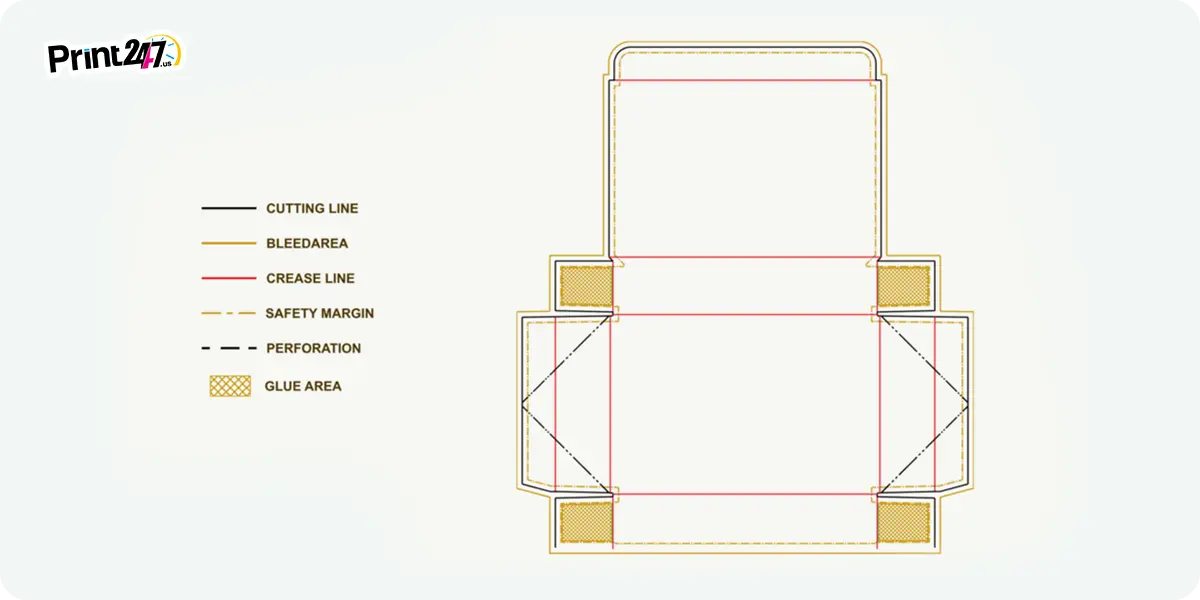
Fold lines show where the board or material will be scored so it can be folded into the finished form. These lines are just as important as the cut lines because they determine how the panels will move when the package is assembled. A box can only fold correctly if the crease lines are placed accurately.
Bleed area
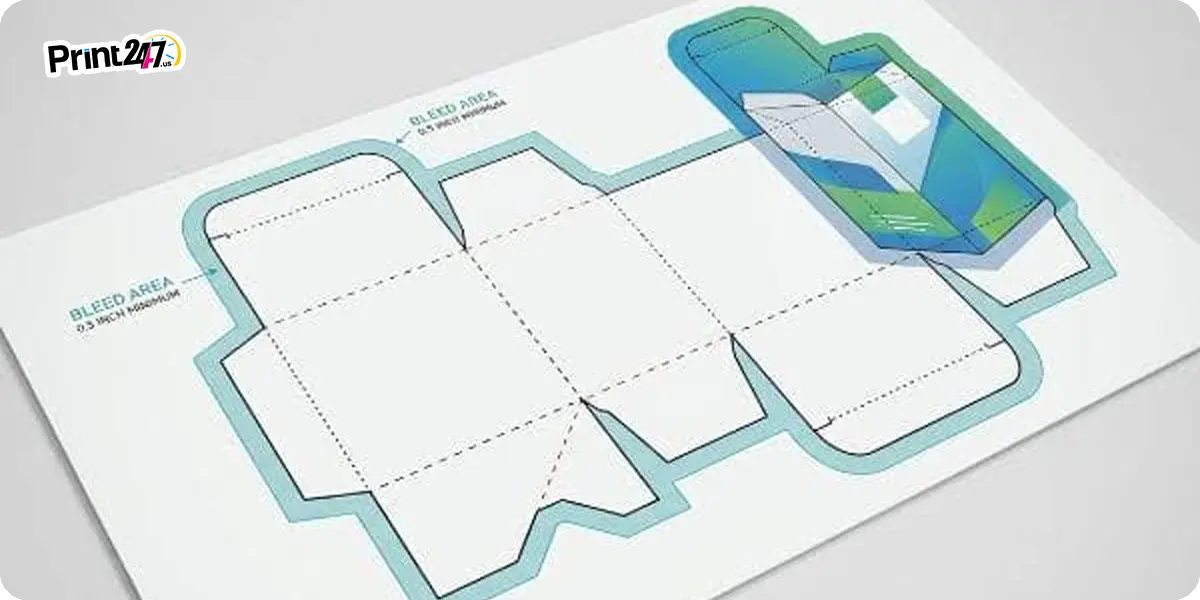
It is the extra printed area that go further than the cut line on a flat sheet of material. The sole purpose of bleed is so that the design is not compromised even if the cutting shifts slightly. This is important when your packaging uses a combination of bold colors & artworks that reach the edge of the packaging.
Safe zone
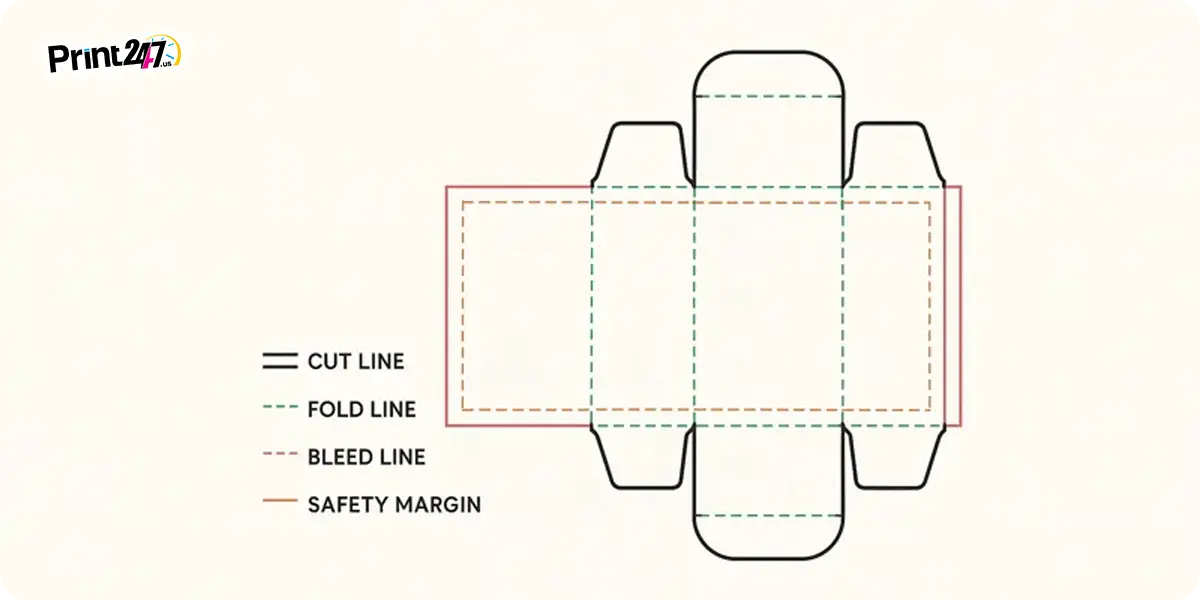
The safe zone is the area inside the cut line where important printing elements should stay. Including text, logos, barcodes, and other critical product information should not get too close to the edge or fold lines. The safe zone gives the design some protection from trimming or distortion.
Glue tabs
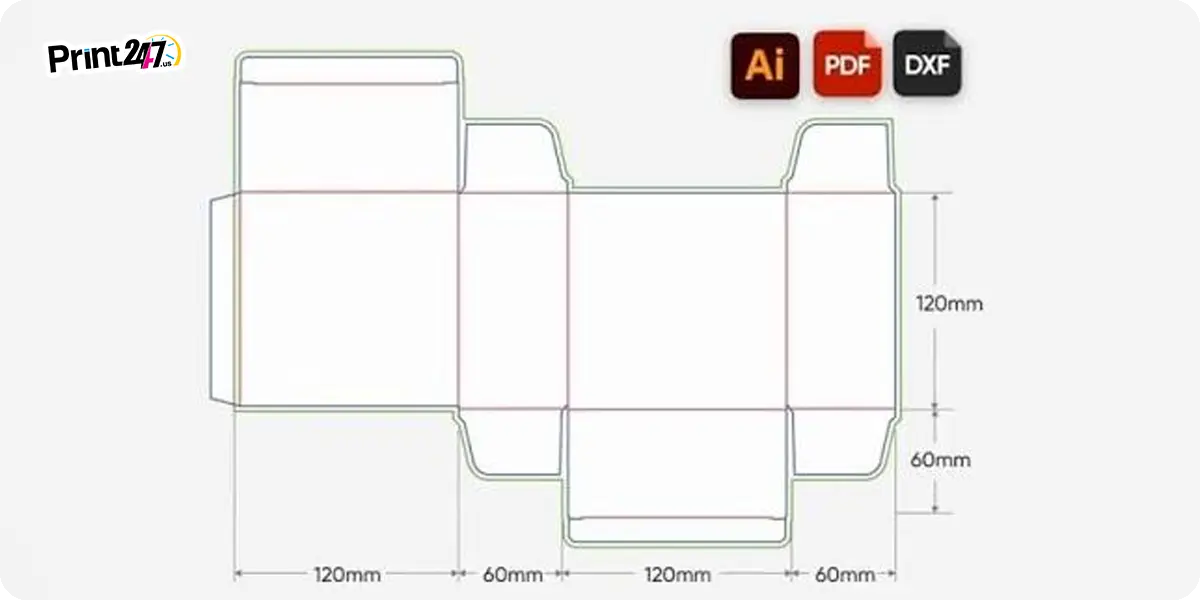
These are the areas where the adhesive tapes or glues will be applied for holding the packaging together. These should be carefully planned beforehand so they do not interfere with the artwork or assembly of the package. If key design elements are placed there, they may disappear once the box is glued.
Perforation lines
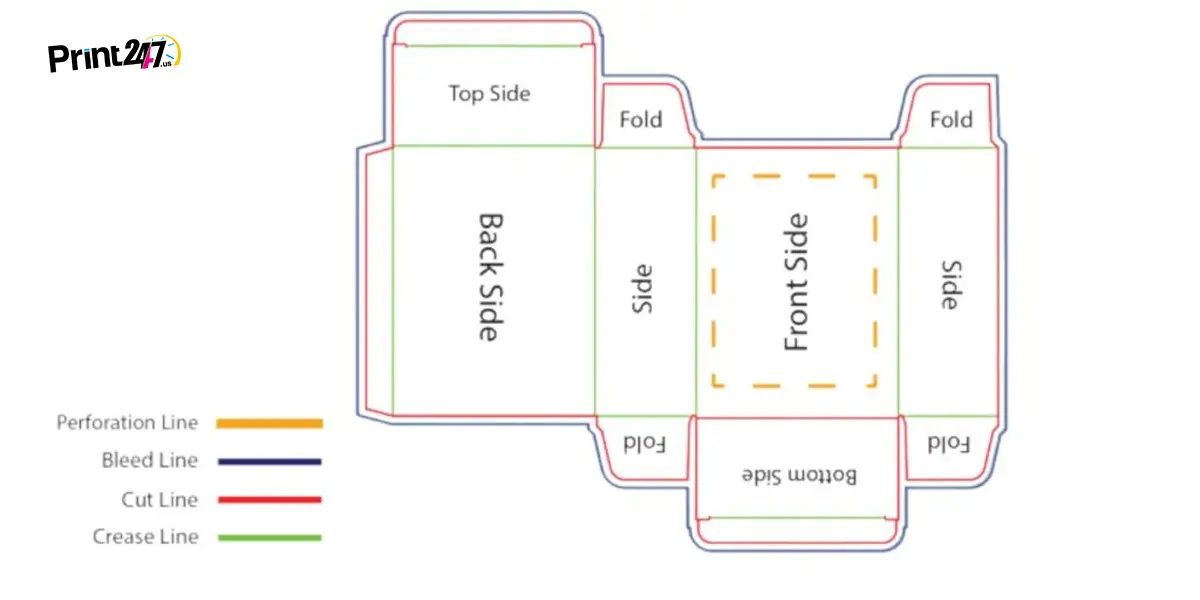
Perforation lines are partial cuts that create an easy-tear section or opening feature. They are useful for tear strips, coupons, opening panels, and other functional features. If your packaging needs a special opening style, the perforation should be built into the dieline from the start.
Importance of Dielines
Dielines matter because they connect the creative side of packaging with the production side. A strong design concept still needs a structure that can actually be manufactured, and the dieline is what makes that possible.
The biggest benefit of a dieline is preciseness. It helps prevent artwork from being placed on the wrong panel or on a fold where it becomes unreadable. It also helps to keep logo, text, and regulatory info at the right position so the package stays perfect and clean.
Dielines also help to reduce the production mistakes. If the layout is incorrect, the result could be costly in many ways. Like reprints, delays, wasted material, and packaging that does not fit the product. That is why printers and packaging suppliers rely on them so heavily before any die-making or press work begins.
They also help everyone visualize the final result. A flat package file can be hard to picture in your head, but when the dieline is used properly, it becomes much easier to understand how the box will look when assembled.
How to Create Dielines
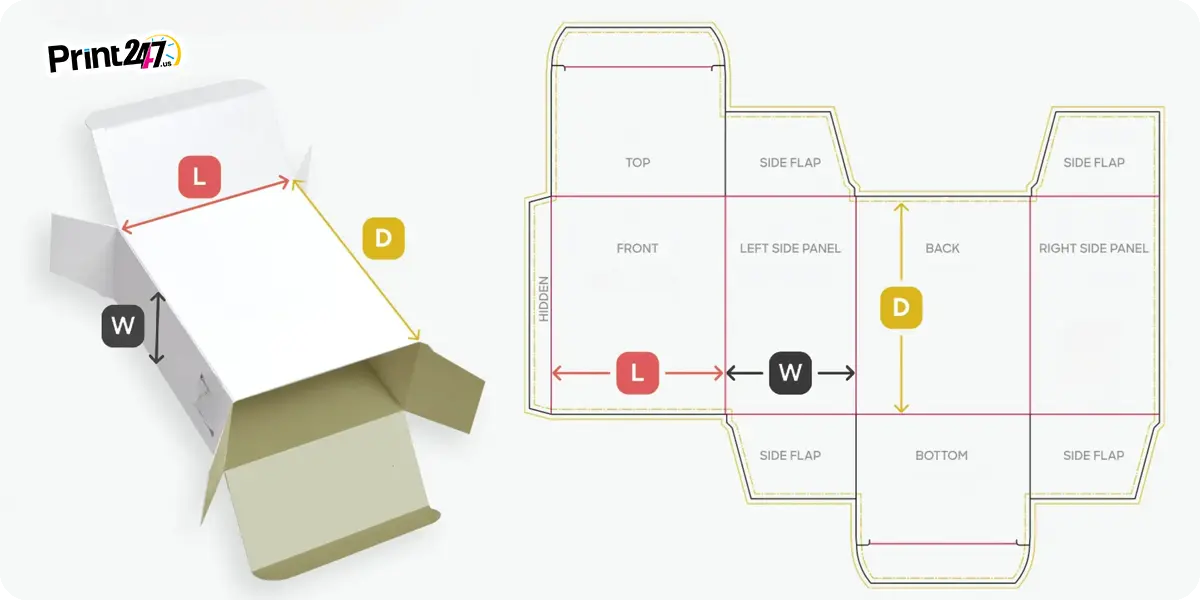
Dielines are usually created by structural designers, packaging engineers, or the packaging supplier. The process starts with the product dimensions and the type of packaging needed. From there, the structure is drawn in flat form so it can be used as a print-ready guide.
Specialized packaging software is used to create the technical structure. Adobe Illustrator is commonly used for artwork placement, while CAD-based tools are often used for the actual box structure. The important thing is that the dieline remains accurate to the real-world dimensions of the package.
The process to create dieline as per your packaging need looks like this:
1. Measure the product.
2. Choose the packaging style.
3. Draw the flat structure.
4. Add cut, fold, bleed, and safe zone markers.
5. Review the dieline for accuracy.
6. Apply artwork on top of the dieline.
7. Finalize the file for production.
At Print247, we do a lot of the heavy lifting. If your product dimensions are clear, the dieline can be made to match your packaging needs and your printing requirements.
How Designers Use a Dieline
Designers use the dieline as a guide when building the visual design of a package. The dieline itself is not the artwork. It is the structure underneath the artwork.
The usual process is to place the dieline on a separate locked layer, then build the packaging design above it. This helps the designer align logos, images, copy, and other visual elements to the correct panels. It also helps make sure that important content stays inside the safe zone and that backgrounds extend all the way to bleed.
Good packaging design depends on reading the dieline correctly. The front panel needs to be treated as the main brand face, side panels may carry supporting information, and glue areas should be left clean.
A well-designed dieline also helps with 3D mockups. Once the structure is placed into a mockup or prototype, it becomes much easier to see how the package will look on shelf or in hand. That is one reason dielines are so valuable early in the project.
Common Mistakes When Creating a Dieline and How Print247 Helps You Avoid Them
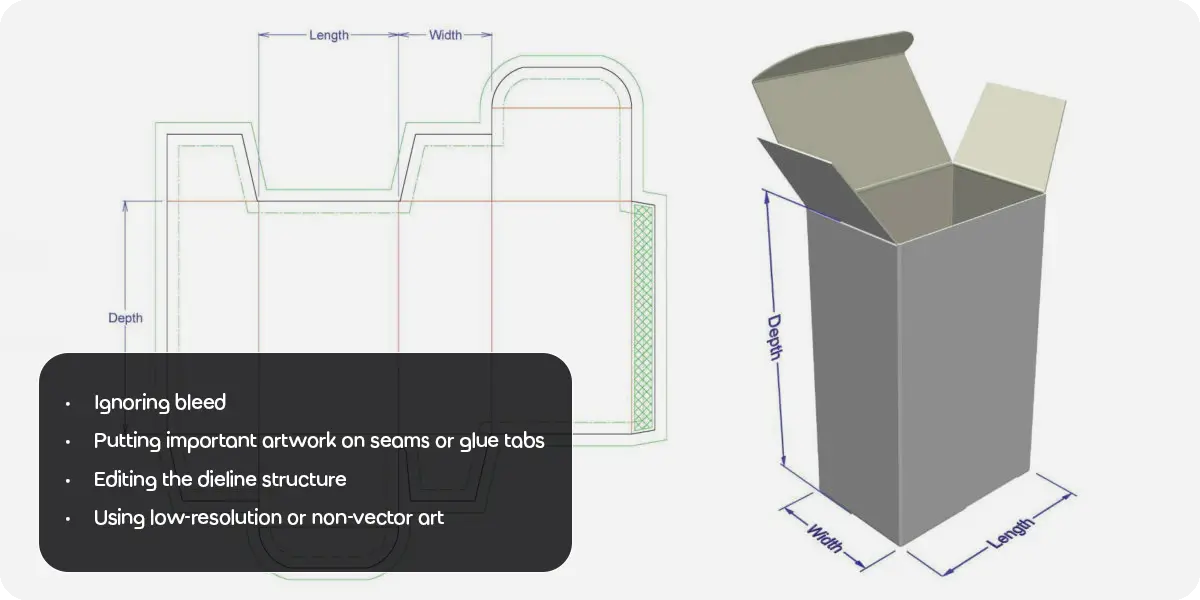
A lot of packaging problems come from avoidable dieline mistakes. The most common issue is ignoring bleeds. If your design stops at the trim line instead of extending into bleed, the final printed package may show thin white edges.
Ignoring bleed
Another mistake is putting text or logo too close to the edge or fold lines. This can make the design look messy or cut off of important information. It can also make the package harder to read once assembled.
Putting important artwork on seams or glue tabs
Designers also sometimes place artwork on glue tabs or seams. That may look fine on the flat layout, but once the package is assembled, those areas can disappear or overlap.
Editing the dieline structure
Casually applying changes in the dieline can leave big impacts. The die cutting could get way off which will result in faulty or wasted packages. Even if the size needs a little change, it should be done with diligence instead of just casually doing it.
Using low‑resolution or non‑vector art
Using the wrong file format or low-resolution artwork can also cause real troubles. Packaging artwork should be vector-based, with print files prepared correctly for production. That is part of what makes the final result crisp and vivid.
At Print247, our team of experts mitigate these mistakes by:
Providing clear dieline templates with labeled panels and guides.
Offering design tips and file‑setup guidance to your designer.
Running pre‑production checks to catch common issues before printing and die‑making begins.
Dielines across Different Packaging Types
The concept of a dieline applies to many packaging and printing formats. You can see dielines used for folding cartons, mailer boxes, sleeves, labels, inserts, folders, and other die-cut items.
The structure could change depending on the format, but the basic principle of dieline stays the same. Every dieline tells the production team where to cut, where to fold, where to leave space for glue, and where artwork must stay safe. That is what makes the file so adaptable across packaging types.
This means dielines are not a one-product concept. If you order a product box, a mailer, or a sleeve, the process still depends on the same logic. The exact shape changes, but the need for accuracy does not.
What Brands Should Check Before Approval
Before a dieline or packaging file goes to production, there are a few things every brand should review carefully.
First, check the dimensions and make sure they match your product to the last centimeter. If the structure is too small or too large, the final box will not work.
Second, check the orientation of panels. Make sure the front, back, sides, and flaps are labeled correctly and that your artwork is placed on the right surfaces. This is important when a package has multiple printed panels.
Third, confirm that all essential elements stay inside the safe zone and that backgrounds reach the bleed. This small step can prevent major headaches later.
Fourth, review barcodes, regulatory text, and any legal copy. These elements should be readable and positioned where they will not be interrupted by folds or trimming.
How Print247 Helps You
Here, we make the entire process of creating a dieline easier as ever by helping brands move from concept to production ready packaging with less confusion. If you are ordering custom packaging, our team can provide the dieline structure for your selected box style and help you understand how it should be used.
We also help make sure the file is print-ready. That means checking the structure, reviewing the artwork placement, and making sure the design respects bleed, safe zones, and fold lines. If you do not have in-house packaging expertise, this support matters even more.
For brands that need a custom solution, we can guide the packaging structure from the start so the final piece. This saves time, prevents production errors, and helps the packaging and printing materials like business cards, flyers, and posters to look as good as the mockup.
Conclusion
In simple words, a dieline is the foundation of every type of packaging and printing material we see in everyday life. It could be a folding carton or a banner. Dieline is part of every printing project. It clearly shows the areas where a flat sheet should be cut, creased, glued, or folded. Once you understand dieline, it becomes much easier to avoid errors and produce packaging that looks performs well.
For customers and businesses working with us, our goal is to take the technical stress out of packaging so you can focus more on making your brand and product look good. If you are planning to get a new box, sleeve, or any marketing material, start with the right dieline and let us help you turn that blueprint into a tangible project.
FAQs
Why do I need a dieline?
Dieline is a significant factor that lets your artwork line up correctly so the package can be produced accurately. Without a dieline, there is no proper structure to follow and the box may not fold properly, and important design elements could be cut off or misplaced.
Can I design packaging without a dieline?
Not entirely. Packaging must be designed on a dieline so the structure and the artwork stays perfect. Designing without one creates a risk of production failures.
What happens if my artwork goes outside the safe zone?
If artwork goes outside the safe zone, it may be trimmed, folded, or hidden in glue areas. That can make the packaging look unprofessional or cause important information to disappear.
Do you provide dielines?
Yes. At Print247, we support custom packaging projects by providing the dieline structure needed for production-ready box design. That makes it easier to move from idea to finished packaging without guesswork.
Get a Quick Quote

More Articles
 Bill ‘Hogg’ Ryan
Is a Protein Powder Pouch Cheaper Than a Tub? Cost and Shelf Life Compared
 Bill ‘Hogg’ Ryan
5 Sports Supplement Packaging Ideas That Win on Retail Shelves
 Bill ‘Hogg’ Ryan